Sunday, January 24, 2016

D5 4k not import to Adobe PPro - Edit Nikon D5 H.264 MOV in Premiere Pro CC/CS6/CS5

This article is going to introduce the workable solution to help convert Nikon D5 4K H.264 MOV to Premiere Pro CC, CS6, CS5, CS4 MPEG-2 for editing.

The Nikon D5 is the first Nikon DSLR capable of capturing 4K UHD video (3840x2160 at 30p), letting users create stunning ultra-high definition video with beautiful clarity and color. Multimedia content creators can also use the D5 to create 4K time-lapse videos in-camera using the Time-lapse Movie function, and can create 8-megapixel still images from frame grabs. A great addition to any production environment, the D5 includes all of the most popular pro-level features of the Nikon D810, including Full HD 1080p video at a variety of frame rates, uncompressed HDMI out, simultaneous live view and headphone/microphone connections. Additionally, the D5 adds a feature to smooth exposure transitions using the Auto ISO function as well as exposure compensation to create natural-looking exposure transitions in video.

“Hello, recently I bought the Nikon D5 DSLR and have used it recorded some 4K videos and 1080p MOV videos, the image quality is very excellent. Today I need to import Nikon D5 4K files and 1080p files to Premiere Pro CC and edit the footages with Adobe Ppro, but after I loaded the videos, I find the Premiere Pro CC can’t edit Nikon D5 files smoothly, what’s the reason? Are Nikon D5 videos not well supported by Premiere? Any suggestion is appreciated, thanks!”


If you have tried to import videos from Nikon D5 to Premiere Pro, you must have found that Nikon D5 4K files and MOV videos can’t be edited smoothly by Adobe Premiere, what’s the reason? It is because Nikon D5 recorded videos are not in Premiere Pro native supported format. From Premiere Pro product page you will know that MPEG-2 format is the most compatible format for Premiere Pro, if your videos are in other formats, then these videos will not be well supported by Adobe Premiere.

So, the best method is to convert Nikon MOV to MPEG-2 before loading to Premiere Pro. For this purpose, this article mainly shows you how to transcode Nikon D5 footage to MPG for Premiere Pro in details.

First of all, free download Brorsoft Video Converter for Mac, a top Mac Nikon 4K H.264 MOV Converter. It supports transcoding all Nikon 4K and 1080p MOV files to Apple ProRes 422 for Final Cut Pro X, FCP 6, FCP 7; MPEG-2 for Adobe Premiere Pro, DNxHD for Avid Media Composer; AIC .mov for iMovie, Final Cut Express and more. This will help you import the file correctly and saving the rendering time. If you work Nikon MOV footage on Windows, please get Video Converter. Now go through the article to check out the solution.

Download the 4K Video Converter for Mac

(Note: Click here for OS X 10.5)

Convert/Import Nikon D5 videos to Premiere Pro for smoothly editing on Mac
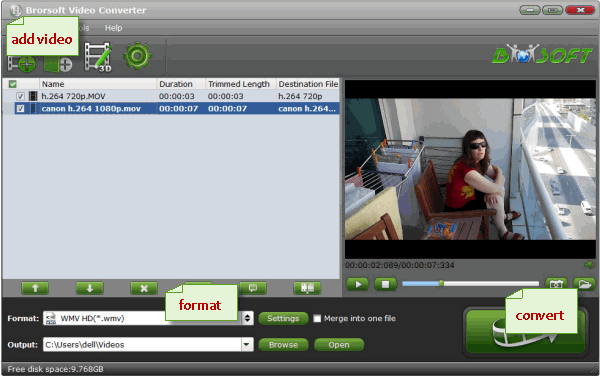
Step 1: Load Nikon D5 4K MOV footage to the software

Install and launch Nikon Video Converter for Mac, and then click "Add" button to browse to Nikon MOV footage either from cam HDD or SD card or drag the footage from your camera to the program.


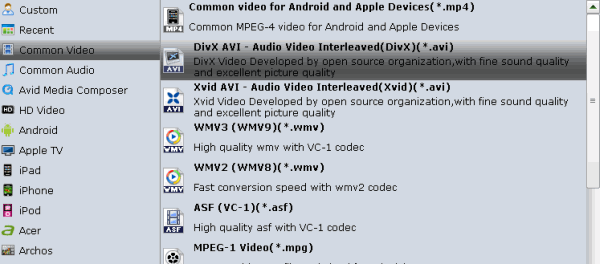
Step 2: Select output format

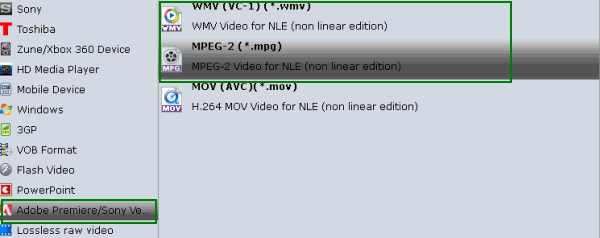
Choose output format. This video converter offers optimized format preset for Adobe Premiere. Just click “Format” menu firstly and then follow “Adobe Premiere/Sony Vegas” to set MPG format.


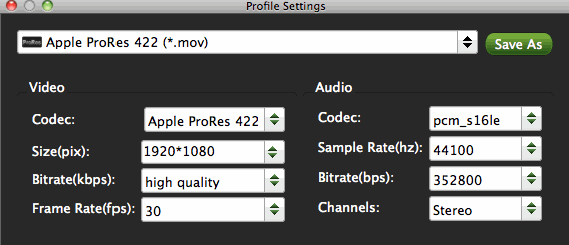
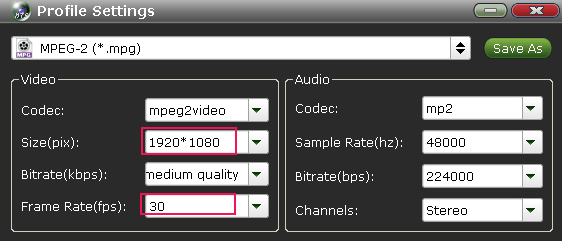
Tip: If the default settings do not fit you requirement, you can click “Settings” icon to and enter “Profile Settings” panel to adjust video size, bit rate, frame rate, sample rate and audio channels.


Step 3: Start converting Nikon MOV to MPEG-2

Finally hit the Convert button; it will convert Nikon D5 .mov to MPEG-2 for Adobe Premiere Pro on Mac immediately.

When the conversion process shows in 100% with the top MOV to MPEG-2 Converter Mac, you can get the resulted videos from output folder easily for easier editing in Premier Pro CS3/CS4/CS5/CS6/CC.

More Topics:

4K Downscaling to 1080p
4K Workflow with EDIUS
4K workflow with Avid MC
4K workflow with Sony Vegas
4K Workflow with After Effects
How to Convert MP4 clips to Sony Vegas Pro
Importing Sony FS7 4K XAVC into FCP 7, X
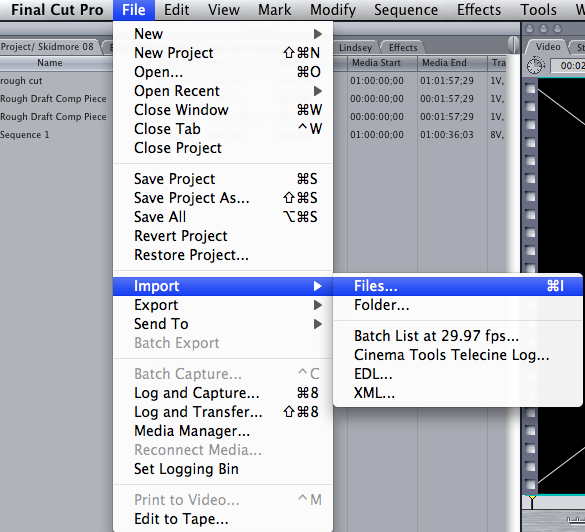
Import Nikon D5 videos to FCP for smoothly editing
Cs5 Premiere Pro Help with Canon EOS 6D 1080p MOV
Convert FLV to ProRes MOV for Editing in Final Cut Pro
Convert AVI to WMV for playing on Windows Media Player

Saturday, January 16, 2016

Rendering h.264 MOV files form Canon 70D to Sony Vegas Pro 13/12/11/10

Here resolve the issues on how to successfully edit and Open Canon 70D H.264 MOV files in Sony Vegas Pro 13/12/11/10 smoothly. 

Q: Audio repeat in vegas ? 
"I'm using the new Vegas movie studio platinum 12 to edit Canon 70D .MOV files. The audio in the file will repeat from the beginning half way through the video despite the fact that the waveform for the audio shows the original audio is there. When played on VLC media player the audio plays fine. What is going on and how can I fix this?" 

Canon EOS DSLR records MOV videos, but it seems Sony Vegas Pro (including the recent Vegas Pro 12) does not like the way. The file type is a compressed output format, but not ideal for editing in NLE system. Here I share a simple guide on how to convert Canon H.264 MOV files for Sony Vegas Pro editing smoothly. If you’re facing the issues, read on to find the answer. 


To get the work done, you can take Brorsoft Video Converter, which is one of the best H.264 MOV file converter tool for you. The program comes with several optimized format for Sony Vegas, which enable you to transcode Canon 70D H.264 MOV to MPEG-2 for using in Sony Vegas Pro directly without any rendering or codec problems. Plus, it also allows you to convert H.264 MOV to DNxHD for Avid Media Composer, etc with best results. Download it and follow the tutorial below to convert Canon 70D H.264 MOVfiles to Sony Vegas Pro effortlessly. 

Free download the H.264 Video Converter: 


How to Convert Canon 70D H.264 MOV to MPEG-2 for editing in Sony Vegas Pro 

Step 1: Install the H.264 MOV to Sony Vegas Converter and run it. Drag the H.264 MOV files from Canon 70D to the software. Or you can also click "Add" button on the top of the main interface to import video to the program. It supports batch conversion and joining multiple video clips into one file. 


Step 2: Click "Format" bar to determine output format. Follow "Adobe Premiere/Sony Vegas" and select "MPEG-2(*.mpg)" as the output format. Besides, you can also choose WMV (VC-1) (*.wmv) if you want to get a relatively smaller output file. 


Tip: In case the default settings do not fit your requirement, you can click "Settings" button and enter "Profile Settings" panel to adjust video size, bit rate, frame rate, sample rate and audio channels. If you want to keep you 5.1 Audio Channels, please set ac3 as audio codec. 

Step 3: Click the "Convert" icon under the preview window to start encoding H.264 MOV for working with Sony Vegas Pro 10/11/12/13. 

Once the conversion completes, you can click "Open" button to get the output files effortlessly. Now you have got it right, just to import and edit Canon 70D H.264 MOV files with Sony Vegas Pro at ease. 

More Topics: 

H.264 to After Effects 
Convert H.264 to H.265 
H.264 Playback on TiVo 
H.264 to Sony Movie Studio 
H.264 to Adobe Premiere Pro 
Ripping and Converting Amazon DVD Rentals 
Fix Sony Movie Studio 12/13 Won't Open Tivo Files 
Guide: Convert FLV to PS4/PS3 friendly video format 
Import and Edit MOV files in Windows Movie Maker 
I Can't Run My Wmv Files On My New Surface Rt ??? 
How to Convert Tivo files for Editing in Sony Vegas Pro 
Best tool to Convert FLV Videos to MOV on Mac El Capitan 
Working MOV files from Canon Rebel T5I in Sony Movie Studio 
Fix Sony PXW-FS7 XAVC and Davinci Resolve 9/10/11/12 workflow issues

Sunday, January 10, 2016

Can't import Sony HXR-NX30 MTS into Final Cut Pro 7, FCP X? Resolved

Have difficulty in importing Sony NX30 MTS into FCP 7? Brorsoft MTS Converter for Mac ( El Capitan include) provides an optimized format for FCP, as well as ProRes, AIC, DNxHD etc to get your files fit FCP best. Keep Reading...

Q: Sony Mts Files And Fcp ???
"I have some MTS files from a Sony HXR NX30 camcorder.
I want to import them to FCP.

I am still on FCP 6.x, which I believe does not support these files.
FCP 7.x does, but it appears that there are some specific requirements.

FCP 7.x will import and covert the files if taken directly from the camcorder, via Log and Capture.

FCP 7.x will import MTS files, if you copy the entire file directory (top level) from the camcorder to a hard dirve.

FCP 7.x *will not* import MTS files copied at the file level from the camcorder.

Compressor *will not* convert MTS files into a usable FCP file format.

Quicktime Pro *will not* convert MTS files into a usable FCP file format.

If I have the raw MTS files on a hard drive (copied at the file level from the camcorder) my only option at that point is to get a thrid party application to convert the MTS files."


Yes ! We can try Brorsoft MTS/M2TS Converter for Mac. With this you can achieve the individual .mts to Final Cut Pro conversion. It's designed directly to convert AVCHD.MTS/.M2TS (1080p60/50 included) to FCP natively supported Apple ProRes. So no matter the AVCHD files are single .MTS files or directly from your camera, you can transfer it to FCP compatible formats and directly import it to FCP for easy editing. Plus, this Mac AVCHD converter also supports converting AVCHD MTS footage to iMovie, Adobe Premiere, Avid Media Composer, Final Cut Express and more to meet your needs. What's more, some easy-to-use editing features like trimming, cropping, adding watermark, deinterlacing, etc are combined with the convert program. Now, follow the step-by-step guide transcoding Sony HXR-NX30 .MTS/M2TS to Final Cut Pro 7/X on Mac OS X ( El Capitan included).

Free Download the AVCHD Converter Mac:

( Note: Click here for OS X 10.5)

The real way to import Sony NX30 MTS videos to Final Cut Pro 7, FCP X

Step 1: Install and run the Mac MTS to FCP Converter, you can click "Add Video" button (or "Add from folder") to load Sony NX30 AVCHD MTS source files.


Step 2: Click on "Format" bar and set a FCP friendly format in dropdown-list. You are advised to "Follow Final Cut Pro" template and "Apple ProRes 422 (*.mov)" format.


Step 3: Click the "Settings" button and customize proper video/audio parameters if necessary. Video size, bitrate and fame rate are flexible and can be adjusted as you like. Usually 1920*1080 video size and 30fps video frame rate are recommended for FCP editing.


Step 4: Click "Convert" to start converting the MTS/M2TS to Apple ProRes 422 codec. After conversion just click the "Open" button to locate converted video files for FCP post-production seamlessly.

Step 5: Launch Final Cut Pro 7/FCP 6, choose File >> Import >> Files..., and browse to where you save the converted AVCHD clips to. Choose the videos that you'd like to add.


More Topics:

Convert MTS to MP4
Trancode MTS for Premiere
Transcode MTS to Pinnacle
Convert MTS to MOV Mac
How to Convert and Merge MTS files
How to Import MTS files to Premiere Pro
Change MKV to high quality AVI or other
Top 1: Brorsoft 4K Video Converter for Mac
Guide to Retrieve iPhone Data from SIM Card
How to Convert and Import Canon Vixia MTS files to iMovie
How to Watch MKV movies on Panasonic TV through USB Drive
Convert Panasonic MTS M2TS Files to Davinci Resolve Format

Monday, January 4, 2016

Guide to Insert VOB media to PowerPoint without losing quality

Summary: This article shows you how to convert VOB to PowerPoint supported video format so that you can insert VOB into your PowerPoint presentations.

Let's suppose, you are making a PowerPoint (PPT) to give a presentation in class or business meeting to illustrate an idea or concept, and then you want to insert some VOB videos ripped from a DVD disc into the PowerPoint presentation. However, PowerPoint doesn't support the VOB formats. If you are looking for ways to embed VOB to PowerPoint presentation, just read on.

As far as I know, you are only allowed to add a limited video formats including ASF, AVI, MPEG, WMV, etc to PowerPoint. Therefore in order to insert the VOB movie to PowerPoint, you can convert VOB to PowerPoint supported video formats first and then insert the converted videos to your presentation. In this way, you can realize inserting VOB to PowerPoint presentation.

To accomplish the task, you need to seek help from a VOB Video converter that supports the VOB video input and WMV, AVI output. Here Brorsoft Video Converter is highly recommended to help you achieve your task. With the help of the best program you can change almost any popular file format including VOB, MKV, MOV, AVI, MP4, WebM, etc. to PowerPoint compatible video format with fast encoding speed and excellent output quality. If you want to insert files from VOB to PowerPoint on Mac, try the equivalent Mac version - Brorsoft Video Converter for Mac. Just get the right version and follow the guide below to convert VOB to PowerPoint supported video formats and insert videos to PowerPoint presentation.

How to convert VOB to PowerPoint supported video formats

Step 1: launch the VOB to PPT converter. Click the Add Files button on the main interface to import VOB files to the app. The VOB Video converter supports batch conversion, so you can add a pile of videos to enjoy the fast conversion speed.


Step 2: Click Format (located below where your source files are displayed) and choose WMV or AVI as the output format on the Format > Common Video list.


Step 3: Press on "Convert" to start encoding VOB Videos to Microsoft PowerPoint Presentation compatible video. When conversion completes, press on "Open" to locate converted videos.

Step 4: Embed converted VOB video in PowerPoint. Before starting embedding video to PowerPoint, you need to create a folder and put both your converted video and your PowerPoint presentation in this folder. Then open the PowerPoint in this folder to insert the converted video file which is just located in this folder.

Tips: For PowerPoint 2007 and higher, select Insert tab from ribbon, and click Movie and select the converted file to insert into PowerPoint for playback.

For PowerPoint 2003 and lower, from menu, select Insert -> Movies and Sounds -> Movie from File..., and select the converted file to insert into PowerPoint.

More Topics:

Converting 4K video to work in Apple TV
Convert MKV to Apple TV Supported Format
Convert iPad video to ProRes for Final Cut Pro
Tutorial: Convert 4K files for AirPlay to Apple TV 4
Guide: How to Rip and Convert DVD on Windows 10
Guide: Convert TiVo recordings to Plex friendly video
Converting H.264 to MPEG-2 for Adobe Premiere Pro
Play and Watch DVD movie files on LG TV from a USB
Play Video_TS on Windows (Windows 10/8/7 Included)
How to convert Blu-ray ISO to MKV in clicks with ease
Rip 3D Blu-ray to SBS 3D MKV on Mac OS X El Capitan
Convert DVD VIDEO_TS folder to play on Android devices
How to Convert DVD ISO for Editing in Final Cut Pro X/7/6
2 Methods to Convert 720P/1080P MKV files to Android Phone/Tablet