Monday, December 28, 2015

L840 MOV in Vegas Pro 13/12-Put Nikon Coolpix L840 h.264 videos to Sony Vegas Pro

To finish converting Nikon Coolpix L840 1080p MOV to MPG before importing into Vegas Pro 12/13, let's read the blow step by step guide.

If you want a compact camera that shoots stunning Full HD videos, the COOLPIX L840 delivers. Full HD 1080p means exceptional video quality. Record the action, then connect to an HDTV* and watch your videos come alive. A built-in mic records high-quality audio in stereo. Your videos will look and sound phenomenal.

File formats
Still images: JPEG
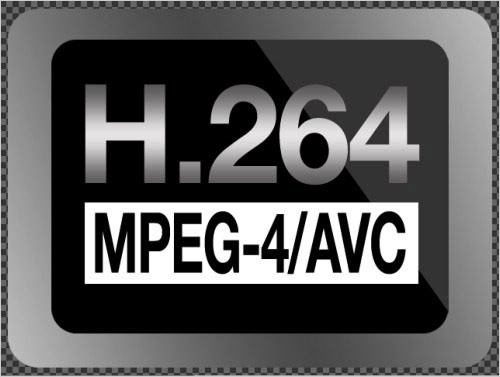
Movies: MOV (Video: H.264/MPEG-4 AVC, Audio: LPCM stereo)

When import the L840 MOV to Sony Vegas, you may encounter lots of issues, such as nothing shows up on the screen, there is only image, or you only get sound in Sony Vegas Pro. The H.264 MOV format is not easy to use in editing software. Sony Vegas Pro most compatible video format is MPEG-2, so it's a good choice to convert Nikon Coolpix L840 1080p MOV to MPG before importing into Vegas Pro 12/13.


To make Nikon Coolpix L840 MOV video files to work well with Sony Vegas Pro, Brorsoft Video Converter Ultimate is highly recommended to transcode MOV to Sony Vegas Pro native format- MPEG-2. No matter what version of the NLE apps you are applying, and what Windows system you are working on, this video converter will assist you to import MOV as well as AVI, MTS, MKV, MPG, etc clips to Sony Vegas Pro, Adobe Premiere Pro, Pinnacle Studio, Windows Movie Maker, etc for editing smoothly. Follow its step-by-step instruction below to learn how to convert Nikon L840 MOV to MPEG-2 for Vegas Pro.

Download MOV to Sony Vegas Pro Converter:


Transcode Nikon COOLPIX L840 MOV into Sony Vegas Pro 12/13

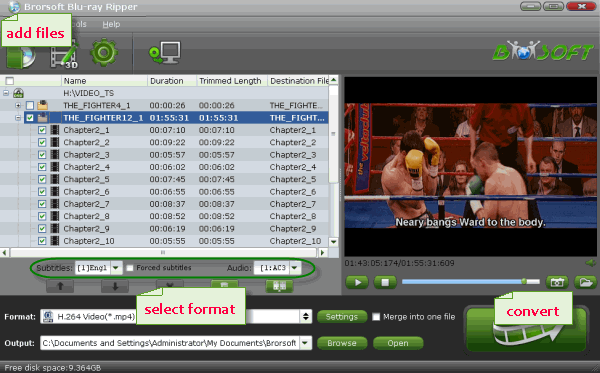
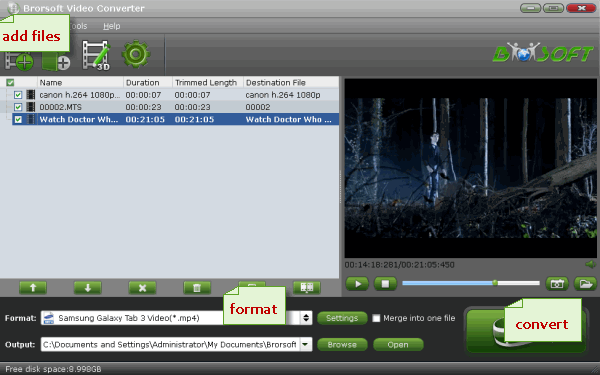
1. After launching the Nikon MOV Converter, click the Add button to load your footage to it from your Nikon D810. If necessary, you can click the button "Merge into one" to join several videos to one file.


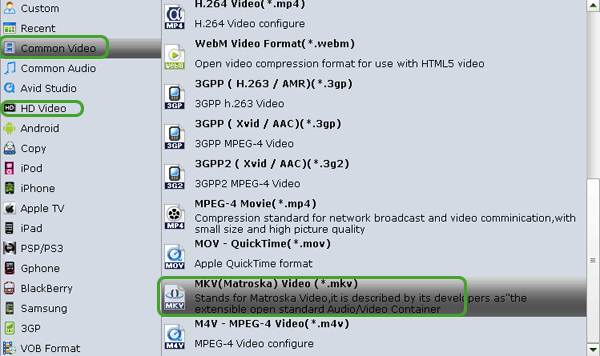
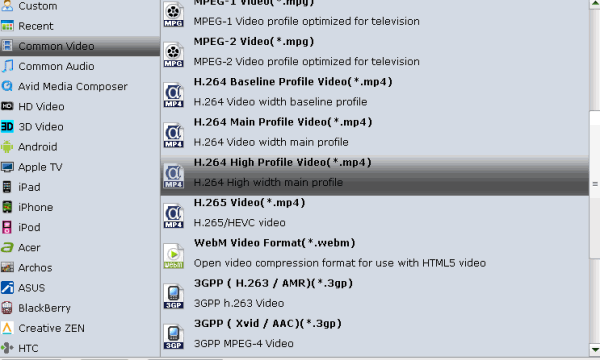
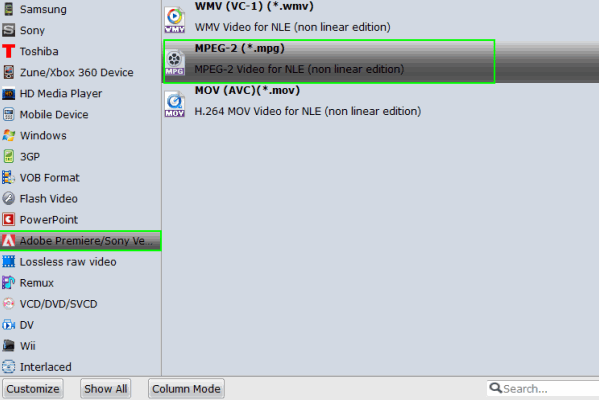
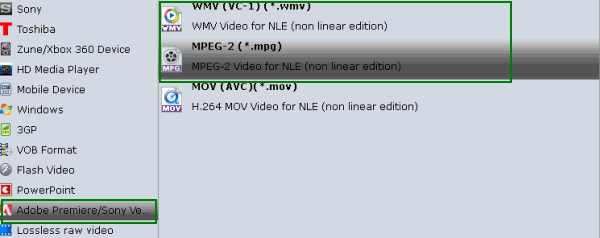
2. Click the format bar or the pull down menu of "Format" to select output format. To get Nikon COOLPIX L840 MOV into Vegas Pro, the best format is "Adobe Premiere> MPEG-2 (*.mpg)".


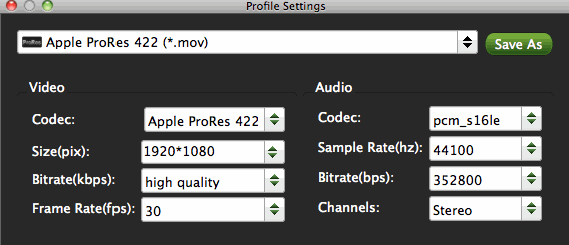
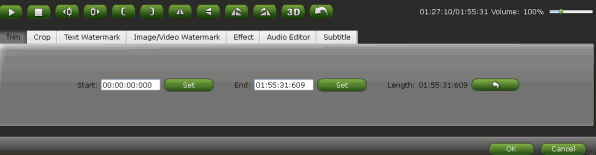
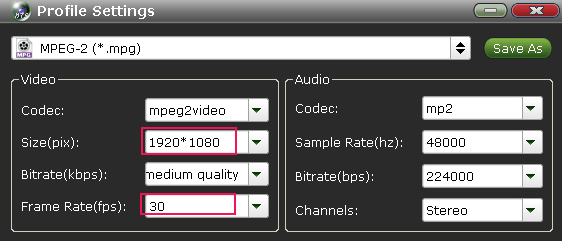
Tip: To get a perfect video for editing in Vegas Pro, you’d better press the Settings icon to adjust output parameters, including the Bitrate of Video and Audio, the Codec of Video and Audio, Video Size, Sample Rate, Frame Rate, Audio Channels, etc.


3. Finally, click Convert button to start to convert Nikon COOLPIX L840 MOV to MPEG-2 for Sony Vegas Pro immediately.

After the short conversion, simply click “Open” button to get the converted videos. And now you can import the Nikon COOLPIX L840 MOV footage into Sony Vegas Pro 12/13 with smooth editing.

Additional Tips:

Besides Sony Vegas Pro, this versatile Nikon MOV Converter also enables you to encode Nikon COOLPIX L840 MOV files to Windows Movie Maker, Pinnacle Studio, Adobe Premiere Pro, Adobe After Effects on Windows(10). It’s an ultimate solution for you.

More Topics:

MOV to iMovie
MOV to Final Cut Pro
Convert H.264 to H.265
H.264 Playback on TiVo
H.264 to Adobe Premiere Pro
MOV to Windows Movie Maker
Play MOV in Windows Media Player
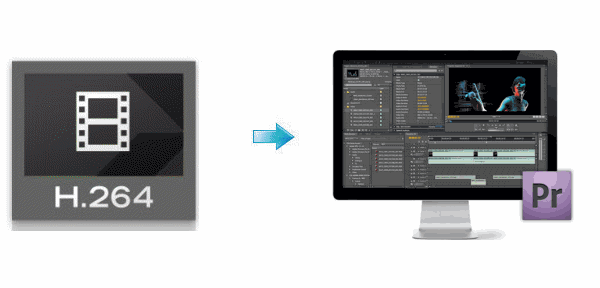
Edit Nikon COOLPIX L840 H.264 MOV in Premiere Pro CC/CS6
Encode Canon C300 Mark II 4K MXF to Premiere Pro CC/CS6/CS
Convert and Import Canon EOS 70D MOV files to Pinnacle Studio
Transcoding Nikon COOLPIX L840 MOV for Final Cut Pro X, FCP 7
How to transcode Canon C300 MK II MXF to MPE-2 for PowerDirector
Convert Nikon COOLPIX L840 MOV to Avid DNxHD for Media Composer

Wednesday, December 23, 2015

Blu-ray to H.264 videos - Easily Convert Blu-ray to H.264 MP4/MKV/M4V/MOV Playback on Mac ( El Capitan )

After converting Blu-ray to H.264 MP4, MKV or MOV so that you can play, edit or share your Blu-ray movies more conveniently. Here is the how !

H.264 (also known as AVC or MPEP-4 Part 10) is an industry standard for video compression. So far it is one of the most commonly used formats for recording and compression of videos. H.264 delivers better image quality compared with most other codecs. Video files with the extension MP4, MOV, M4V and so on usually apply H.264 as video codec.

If you want to view Blu-ray movies on Apple products (iPhone, iPad) or hope to edit Blu-ray files with iMovie for uploading them to your blog or YouTube, the task is really arduous. To eliminate the difficulty in playing Blu-rays on Mac, it is a smart idea to convert Blu-ray to H.264 encoded video.


In fact, with the right program, you can convert Blu-ray to H.264 encoded MKV, MP4, M4V, MOV easily and quickly.

Brorsoft Blu-ray Ripper is one of the most frequently used Blu-ray ripping tool to convert Blu-ray movies to H.264 MP4 as well as H.264 MOV, H.264 MKV etc videos in an amazing way. With full Blu-ray supports, it is capable of removing AACS and BD+ copy-protections as well as converting Blu-ray to all other regular video formats like MP4, AVI, WMV, MOV, FLV, WMV, etc. Moreover, video editing functions like clip, rotate, add watermarks, adjust video effects, etc. are provided. The equivalent Mac version is Blu-ray Ripper for Mac which is able to convert Blu-ray to H.264 MKV/M4V/MOV/MP4 on Mac OS X (El Capitan included). Now just choose the right version according to your demand and follow the guide to accomplish the conversion.

(Note: Click here for OS X 10.5)
How to rip Blu-ray to H.264 MP4/MKV/M4V/MOV with ease

1. Add Blu-ray movies

Install and launch the best Blu-ray Ripping program. Insert your Blu-ray disc into your BD drive, and click "BD/DVD disc" icon to load your Blu-ray movies. You can also import movies files from Blu-ray folder, ISO. Soon after loading, you will find all titles and chapters for the Blu-ray disc. You can select preferred subtitles and audio track.


2. Choose output format
Click Format bar and just select H.264 as output format. Here 3 H.264 presets "H.264 Baseline Profile Video(*.mp4)", "H.264 Main Profile Video(*.mp4)", "H.264 High Profile Video(*.mp4)" are supported.


Select "MKV(Matroska)(for MKV is usually encoded with H.264)Video (*.mkv)" as output format from "Common Video" category under the drop-down list of "Format". If you want to get better HD video quality, just select "MKV HD Video (*.mkv)" from "HD Video" category.


3.Start converting Blu-rays

When all the settings are done, click the Convert button to start converting the added Blu-ray files to MOV, AVI, FLV, MKV, WMV, M4V, etc.

More Topics:

Fastest Backup Blu-ray
Watch Blu-ray on iPad
Play Blu-ray with VLC
Blu-ray to Apple TV 3
Copy Blu-ray to Android
Rip Blu-ray with Subtitles
Embed and Convert MP4 video in PowerPoint
Rip and Convert DVD to Kodi for smooth playback
How to Restore Deleted iPhone 6S/5S/5/4s Calendars
Restore lost/deleted Call history from iPhone 6s/5s/4s
Guide on importing Android Videos into Final Cut Pro

Saturday, December 19, 2015

Canon G5X/G9X .MP4 files importing issues with Final Cut Pro X, FCP 7 ( El Capitan)

Learn how to import Canon G5X/G9X MP4 into Final Cut Pro X for editing with Apple ProRes 422/4444 codec on Mac? You can free download best MP4 to FCP X converter here. 

High-Resolution EVF-Equipped PowerShot G5 X and Slim & Stylish PowerShot G9 X Digital Cameras Featuring One-Inch Image Sensors are Ideal for Advanced Amateur Photographers Passionate about Image Quality. 

Both new models feature a one-inch, 20.2 Megapixel High-Sensitivity CMOS sensor that delivers optimal performance with an ISO range of 125 – 12,800. The sensor, along with a proprietary DIGIC 6 Image processor, creates Canon’s HS System to provide photographers with vivid and detailed still images and video, even in difficult low-light shooting scenarios. 

Providing quality still images and video for social sharing, the stunning 1080p Full HD video (at 24p, 30p, and 60p in MP4 format) and still images captured on these cameras can be transferred after capture to compatible smartphones, tablets, or the new Canon Connect Station CS100 photo and video hub device, via built-in Wi-Fi and NFC capability. Both new models are compatible with Canon’s free Camera Connect App†† for wireless image transfer and remote operation featuring Live View when using compatible iOS and Android devices. 

But, Final Cut Pro might not work with Canon G5X/G9X MP4 files sometimes due to the codec issue or other reasons. In that case, you might try to find a way to convert MP4 to Final Cut Pro compatible format like MOV, DV, etc. This article here shows the MP4 to Final Cut Pro Mac conversion in details. 
 
To successfully import Canon G5X/G9X MP4 files to FCP, a recommended solution is to convert Canon G5X/G9X video to Apple ProRes for FCP. Brorsoft Video Converter for Mac is just the right MP4 to FCP converter for you. It's able to transcode Canon G5X/G9X MP4 files to Final Cut Pro more compatible format ProRes 422, ProRes 422 HQ, ProRes 422 LT, ProRes 4444 without quality loss. Plus, this Mac video converter app can also encode MP4, MTS, AVI, MXF, XAVC, MKV, etc videos to Avid Media Composer, iMovie, Adobe Premiere Pro. Just download it and follow the tutorial below to get the work done. 

Free download Canon MP4 to ProRes Converter Mac: 

 (Note: Click here for OS X 10.5) 

How to Convert Canon G5X/G9X MP4 and Import MP4 to Final Cut Pro X/7/6 

Step 1: Load MP4 files to the program 

Launch the MP4 to FCP X Converter and click "Add File" button to locate the .mp4 file(s) from Canon G5X/G9X you want to add. Check the "Merge into one file" box, you can join several .mp4 clips together if necessary. 


Step 2: Select output format 

When it comes to choosing the output format for these target videos, you directly one choose "Final Cut Pro" preset. For compression, Apple ProRes 422 will do fine for keeping the original MP4 quality the same and creating a Final Cut friendly file format. Apple has made a few variations to the ProRes family - use ProRes 422(Proxy) or (LT) for smaller file sizes(Applied to FCP 7 and above version). 


Step 3 (optional): Adjust the video, audio settings 

Click "Settings" to fix the frame rate, bitrate, video size, etc to your needs. If you want to edit in Final Cut without having to render the clips while editing, all the frame sizes must be the same as the sequence settings. You can save a lot of render time by making all the clips the same size with this Mac MP4 converter. 


Step4: Start MP4 to ProRes conversion on Mac 

Click the big "Convert" button at the bottom right corner to finish transcoding MP4 to ProRes for FCP. 

When the conversion is done, you can find the output files by clicking "Open" button on the main interface, then you can transfer the encoded MP4 files to your Final Cut Pro, FCP 7 or 6 to edit with ease. Once you've got your video edited, you can export to any codec/container that you'd like for playing and sharing. 

Related Guides: 
How to Import MP4 files into iMovie 
Get 4K videos playable onto the new Apple TV 
Problem uploading video clip AVI file to YouTube 
How to import Nikon D5500 MOV files into EDIUS 5/6/7 
Tutorial on converting Sony a68 XAVC S to Final Cut Pro 7 
Import Sony PMW-EX1 XDCAM BPAV files to Final Cut Pro 
How to import DJI Inspire 1 4K video into Adobe Premiere Pro 
How to Convert GoPro MP4 for Editing in Avid Media Composer 
How to Get Samsung Galaxy gadgets to Play your Large MP4 files 
Edit SWF movies in Premiere Pro CC/CS6/CS5/CS4 (El Capitan) 
Transcode Sony FS7 4K XAVC MXF/1080P ProRes MOV files to DaVinci Resolve 11

Tuesday, December 15, 2015

Stream Tivo Show via Plex - Make Plex Media Server play Tivo Recordings easily

Follow the tips below to easily make Plex Media Server play Tivo Recordings in just a few mouse clicks. 

We all know that Tivo is a digital video recorder which can record TV programs for people to watch at later time. To achieve more convenience, many people try to watch Tivo videos on iPhone, PSP, iPod, iPad, Plex Media Server, etc or edit Tivo videos on iMovie, FCP, etc. or share Tivo videos to YouTube, Facebook, etc, but eventually they will not succeed. That's because Tivo choose MPEG-2 format, a high quality video format, to record videos. 


With the purpose to play TiVo files via Plex Media Server, one recommended method is to convert TiVo to a more compatible video format like MP4. . In this passage, we'd like to recommend an ideal TiVo converter for you, which is called Brorsoft Video Converter , will have an excellent performance in converting TiVo file to any video or audio format. It has an equivalent Mac version Video Converter for Mac to aid you to solve TiVo to Plex incompatible issues on Mac OS X. Download it below and follow the tips below to convert TiVo to Plex Media Server easily. 

Download TiVo Converter: 

  (Note: Click here for OS X 10.5) 
Guide: Convert TiVo recordings to Plex friendly video 

1. Load TiVo files > Launch the ideal TiVo to Plex Converter. Click "Add" button on the main interface to load your TiVo files to the program. (Drag&Drop function is included.) 

Tip: When first loading, Brorsoft TiVo Converter will ask you to input your Media Access Key. Simply enter your Media Access Key, and click "OK" to confirm. 


2. Select output format > Click "Format" and choose MP4 from "Common Video" as output format, the most compatible video format for Plex. 


Tip: Simply click Settings bar and you can tweak the settings to your satisfaction. With the right settings you can retain the quality of the original videos while also saving space. This is particularly helpful when streaming over your network, depending on your network quality. 

3. Start converting TiVo to Plex > Finally, hit the "Convert" button at the bottom of the main interface to start the conversion. It will automatically convert TiVo files to Plex Media Server compatible video files with the best quality. 

After the conversion, click "Open" to quickly find the converted movies. Then, Plex Media Server will recognize, play and stream the TiVo files beautifully. 

Related Guides: 

How to Stream TiVo shows via Apple TV 
How to transfer TiVo shows to Android tablet/phone 
How to Convert and Import TiVo recordings to iTunes 
How to Convert DVD ISO to play on Apple TV 4/3/2 
How to Easily Convert Blu-ray to H.264 MP4 
Guide to Convert FLV to PowerPoint supported video formats 
Get ISO image onto iPad Mini 4/3/2 for easy viewing 
How to import Nikon D5500 MOV files into EDIUS 5/6/7 
Get 4K videos playable onto the new Apple TV 
How to convert .dvdmedia to MOV/MP4 on Mac easily 
How to convert MKV to PowerPoint supported video formats 
Convert iPad video to ProRes for Final Cut Pro 
How to make TiVo editable in Adobe Premiere Elements

Sunday, December 13, 2015

How can i Edit Nikon D5500 MOV in EDIUS 5/6/7 at ease

Read this post to find a step-by-step guide explaining how to convert Nikon D5500 MOV clips to MPEG-2 for use in Edius 5/6/7.

With the D5500, Nikon introduced a suite of subtle improvements that streamlined and improved the already great D5300. It retains its predecessor's sturdy build while slightly slimming down the bulk. Better still, it comes with a touchscreen LCD—a handy addition, particularly when it comes to shooting video. Whether you're a Nikon die-hard or looking to pick up your first DSLR, the D5500 is a solid all-around buy.

Quesiton: No D5500 editing in Edius??
"Just got my new D5500 so I shot some footage and dumped into Edius and DOH!
It turns out you need to convert the MOV file to something Edius can read first. Tech support basically says deal with it - no word on a fix.
Anybody else tried it yet?"


To import Nikon D5500 MOV movies into Edius 5/6/7 for further video editing without problems, the easy option is to convert MOV video files for Edius. To get the work done effortlessly, you can turn to Brorsoft Video Converter to convert MOV to EDIUS compatible video format. The program is a professional yet easy-to-use video converter. It lets you convert MOV files to Edius in a few clicks. And EDIUS preset is included for easy access. See how below about converting Nikon D5500 MOV to EDIUS format.

READ MORE: How-To: Import MOV files to Sony Vegas | Load MOV files to Pinnacle Studio


How to import Nikon D5500 MOV files into EDIUS 5/6/7

Step 1: Load original MOV files

Click "Add" button on the main interface to load your MOV files once you set up the professional MOV Converter on your PC. (Drag&Drop function is another way to import the videos.)


Step 2. Select output format

Click "Format" bar and choose "Adobe Premiere/Sony Vegas > MPEG-2 (*.mpg)" as output format on the drop-down menu. Of course, you can also choose MPEG-4, WMV from "Common Video" as the output format.


Tip: Click the Settings icon to adjust video and audio parameters on the Profile Setting as you need to get the best quality video.

Step 3. Start D5500 MOV to EDIUS Conversion

After all settings, hit Convert button to start transcoding Nikon D5500 MOV for EDIUS with the best MOV file converter.

Once the conversion is completed, click "Open" button to find the generated videos, and then you can transfer the converted MOV files to EDIUS 5/6/7 easily and quickly.

More Topics:

How to Import MOV files to iMovie
How to Import .MOV files to Adobe Premiere
How to Easily Convert Blu-ray to H.264 MP4
Get ISO image onto iPad Mini 4/3/2 for easy viewing
How to edit Nikon D610 MOV files in Pinnacle Studio
Guide to Convert FLV to PowerPoint supported video formats
Convert and import Nikon D7200 MOV files to Pinnacle Studio
Convert and import Nikon D750 MOV files to DaVinci Resolve
Guide: How to Convert Nikon D810 MOV to Avid DNxHD for Davinci Resolve 11

Tuesday, December 8, 2015

Extract MP4 video files from Video_TS folder easily

Summary: This guide will show you how to convert Video_TS folder to MP4 video files so that you can playing on iPad, iPhone, iPod or other media players freely.

A VIDEO_TS file is a DVD folder file, mainly containing all data for the DVD movies. Usually you can view the Video_TS files on your computer and standard DVD players. However, trouble comes when you try to play Video_TS in popular portable players and devices like iPhone, iPod, iPad, iTunes, iMovie, QuickTime, PS3, Xbox 360, Android Phones, BlackBerry and more since Video_TS files are not compatible with these software or device, let alone upload Video_TS to video sharing websites, edit in video editing tool or burn into DVD.

In this case, many users may eager to convert Video_TS to MP4, which is the most widely used video formats and compatible with most popular portable devices, players, editing tools and some video sharing sites. In fact, it's quite easy to get that done if you have the right Video_TS converting tool. Brorsoft DVD ripping for Mac (El Capitan included) software is highly recommended to help you convert entire Video_TS to MP4 single files without any troubles.

Except for MP4, you can also encode your DVD Video_TS folder to MKV, MOV, AVI, WMV, FLV, MPEG, etc. formats for playing on iPhone, iPad, iPod, PSP, Xbox 360, Samsung Galaxy Tab, etc. Furthermore, the built-in editor lets you edit and touch up your movies to get the part and effect you want. If you're using a Windows, simply turn to Brorsoft DVD ripper, which will help you convert Video_TS folder to MP4 on Windows (including Windows 10). Now download this program and follow the steps below to finish your task.

How to Convert Video_TS Folder to MP4

1. Load VIDEO_TS files to the converter

Load Video_TS folder > Launch the VIDEO_TS converter and click "Load DVD" to select and load the Video_TS folder to the program. As you can see, added files will be displayed on the left source pane and can be previewed on the right preview window. You can select the titles you want to convert and rip them to separate video files or a single video by clicking "Merge into One File".


2. Choose output format

Choose output format > Click on the dropdown menu of “Format”. As you can see, you can either select MP4 or any other popular video format as the output format. And 150+ video presets for iPhone, iPad, iPod, HTC, Apple TV, Samsung, Motorola, Xbox 360, PSP, etc. are provided for you to get videos with optimized settings for your devices.


3. Edit your VIDEO_TS files(Optional)

You can click Edit to trim, crop the DVD VIDEO_TS movies so as to get the part you want or add some special effect on your movie.


4. Start VIDEO_TS to MP4 conversion

Start to convert > When all the settings are OK, click Start to convert your Video_TS files to MP4. And when the conversion completes, click Open t to locate the converted MP4 videos.

More Topics:
Convert Video_TS to AVI
Convert Video_TS to MOV
Convert Video_TS to iMovie
Play Video_TS on Windows
Convert Video_TS to Apple TV
Problem uploading video clip AVI file to YouTube
Play MKV Files on Android Phones/Tablets Easily
Guide: How to Rip and Convert DVD on Windows 10
How to import DJI Inspire 1 4K video into Adobe Premiere
Import Sony PMW-EX1 XDCAM BPAV files to Final Cut Pro
Converting Sony a68 XAVC S to Final Cut Pro 7 in simple steps

Wednesday, December 2, 2015

H.264 MP4/MOV Editing in Premiere Pro-Can H.264 video directly imported into Adobe Premiere Pro CC/CS6/CS5/CS4

How to convert H.264 MOV, H.264 MP4 for Adobe Premiere Pro? Brorsoft Video Converter can help you to convert H.264 videos to any video format on Mac and Windows. Below simple guide to fix the problems with H.264 mov, H.264 mp4 and Adobe Premiere Pro CC/CS6/CS5/CS4.

Q:

"I don't know if you have ever met Nikon D7200 H.264 MOV to Premiere Pro CC incompatibility issues? H.264 MOV delivers stunning picture quality, but it not an ideal editing format for Premiere Pro CC, can we import H.264 MOV to Premiere Pro CC directly without any hassle? "

“I’m a video editing fan, I like editing and sharing my footage with my family and friend. I got GoPro Hero 3 last week. There’s something wrong with the Premiere Pro CS6, I can’t import the H.264 MP4 video into it. How to solve this promlem?”

To work H.264 codec in Adobe Premiere Pro , the easy workaround is to convert H.264 to Premiere Pro edit-friendly format like MPEG-2 with a powerful third party H.264 encoder program. There are few softwares online for you to choose to decode and encode H.264 files .

Luckily, here is a professional H.264 Video Converter recommended to you - Brorsoft Video Converter. By running it, there's no need to set the codec yourself: the program has optimized presets for Adobe Premiere Pro CC/CS6/CS5/CS4. You can convert any video file to Premiere Pro compatible format while keeping the original quality.

Now just download its free trail version and follow the below guide to convert H.264 for playing, editing in Adobe Premiere Pro.

(Note: Click here for OS X 10.5)

Converting H.264 to MPEG-2 for Adobe Premiere Pro

1. Launch the H.264 to Premiere Pro Converter and click "Add File" button to locate the H.264 file(s) you want to add.

Tip: Check the “Merge into one file” box, you can join several .mp4 clips together if necessary.


2. Choose Premiere Pro preferred format. Click “Format” pull down list to select Adobe Premiere/Sony Vegas> MPEG-2(*.mpg) as the best video format for Premiere Pro. WMV, MOV formats are the good choice as well.


3. Click "Settings" to fix the frame rate, bitrate, video size, etc to your needs. To have a smooth editing with Adobe Premiere Pro, you need create the files with the appropriate resolution and frame rate that matches your source footage.

4. Click the big "Convert" button at the bottom right corner to finish encoding H.264 to MPG for Adobe Premiere Pro.

After the conversion, you can find the output files by clicking "Open" button on the main interface, then you can transfer the encoded H.264 files to your Premiere Pro CS4/CS5/CS6/CC to play and edit without any issue.

More Topics:

H.264 to iMovie
H.264 to After Effects
Convert H.264 to H.265
H.264 Playback on TiVo
H.264 to Sony Vegas Pro
H.264 to Sony Movie Studio
H.264 to Windows Movie Maker
Easily Convert WebM to MP4 on Windows and Mac
How to convert and play Video_TS folder on Apple TV 4/3/2
Guides about converting VOB movies for uploading to Dropbox